Saturday, May 19, 2012

Going Shooting

Tomorrow looks to be a really good day.  Here is what I have laid out.

We are looking at .223 and 9mm goodness.  Yes I use steel case ammo to practice with I know some rifle makers do not like it but Hornady is making steel case ammo, CCI has been making aluminum pistol ammo for a long time and when I can get it I buy it up.  I use the good stuff for hunting.  Currently for hunting I am using 69 grn hollow point but I bought a bunch of Bitter Root Valley 64 grain power point we will see how that works this fall. I can testify though that the 69 grain does the trick.  I bought a box of 20 still have 19 and that was a real nice 8 point Whitetail.

Here is my carry rig.  I have a Blackhawk chest holds AR 30 rnd mags plus two pouches for items the size of a pistol magazine, a Brownells AR mag holder, a Blackhawk double stack mag holder for my Taurus Pro 9mm, if you think the knife is over the top sue me.  It is a Cold Steel Recon Scout.  For the record I am not a range commando, I do not have 8 different things hanging off of rails of my rifle.  As a matter of fact my rail (1) is currently empty.  The one thing I do need to improve is my sling but I am waiting on Magpul's new rifle stock to come out.  I am torn between VTAC's padded two point and Blackhawks three point sling.

Anyway here I am kitted out.  These are casual pictures just having a bit of fun and yes the queen was laughing at me.  Kind of brings one down to earth.


Wednesday, May 16, 2012

New Knives

As I have stated before I like knives I like them a lot as a matter of fact I just got a new one a Boker Karambit. 


The karambit or kerambit is a small hand-held, curved blade from Southeast Asia, particularly the Malay Archipelago. Called karambit in the Philippines, it is known as a kerambit in both Indonesia and Malaysia

Silat teaches to use the knive with the first finger in the loop for slashing cuts.  The curve on this knife perfectly aligns it with the bones in the arm and would be a powerful stabber as well when used with a punching motion.  In saying this am I a master knife fighter or even anygood? No, but I can sing a tune. 

I just like knives. 

Anyway a customer knows that I like them as much as he does but he hates shiny blades so he brings me a couple of very nice Bowies with bone handles and tells me make the blades disappear. 


Yes that blade is as big as it looks.  I am using a spray matte black finish that I am also going to use on my Matte AR project.  Oh and yes I did tape off the handles so none of the finish got on the handles. 


Sunday, May 6, 2012

Hiking Gear Eval.

My queen and I went on a kayaking / hiking adventure and the weeks leading up to it I was prepping well now time for a gear review.  My queen actually agreed to do a sit down after action review after a rita or two.  This is from my notes so bear with me. 

Tents: We took two one for the first night after kayaking so we could stretch out it is a four person Ozark Trails tent from Wal Mart - $40.00 it suited out purpose just fine we were nice an comfy as we had beautiful weather.
No Limits King's Peak: Two person backpacking tent.  There is room for two plus some gear but you can put your rucks in non-bear country under the rain fly which we always put up because you never know.

Packs: We both have Outdoor Products entry level exterior framed packs.  These plastic framed packs have been great and they are both light.  Main complaints is that my Queen's shoulder straps will not stay in place.  I had to tie a knot in them to keep them in place.  Also the slots for attaching extra gear to the bottom of my pack have all broken so instead I just attach directly through the frame.  This is a small quibble.  These packs are good for the short two day hikes we take but could be stretched to four days as we both had an empty pouch and better packing.  My weight wet in the pack was right around 45lbs hers 35lbs.  Finally took advantage of the water bladder compartment however they were not made for the 100oz I bought but we made it work.  We spent $75 a piece for these from Campmor

Cooking Gear:  The new Stanley cook set was fantastic holds 32 oz of water for boiling and comes with two little cups for drinking or food division (this is what we used them for).  The attached handle does not get hot which is great.  Also is very light and was a well spent $20.00.  Our rocket stoves work great they can boil 20oz of water in about five minutes.  My only complaint is the fuel which is heavy and takes up a lot of space however I am not about to give up on these yet and switch to alcohol or fuel tabs.  Mountain house make some descent food the breakfast leaves something to be desired and you have to dump in a bunch of pepper and salt.  We are probably just going to eat main course meals next time for breakfast.  The two person meals are rather bulky but light, Mountain House did a good job with with individual meals in making them smaller.  I bought a cereal that we are going to try before we head out next time to make sure is palatable.  Also we have a double chocolate cheesecake desert we did not get around to eating but I will for sure to make sure is worth the money to take.  I am also thinking about dried milk and cereal.  It would not add that much weight and since we have to carry the water anyway.  I am thinking a zip lock with cereal and dried milk will experiment with the amount and pre-make them.  I will bring my biscuits next time no matter how much fun the queen makes of me I think they are tasty.  I got dehydrated on the hike I forgot my Gatorade much to my dismay. 

First aid / Survival: My homemade kits did just fine I still want professional made ones or a more accurate copy that I put together. I want two small (the small ones double as mine and the queens get home kits) and a larger trauma one and a large general one.  They do not weight that much and I am absolutely paranoid about first aid.  I need to add a small water purification straw to the queen's survival kit.  It would suite her better than the tabs. 

Trekking poles: We have Mountainsmith poles from Academy sadly one of mine did not open and I lost my patience with the other so we set out with just one each.  I have that rectified as of today so we have two each.  The ones we used were really good and for some of the terrain really needed.

Boots: She uses LL Bean lightweight waterproof hikers and I use Magnum Boots 8" Cobra waterproof.  Well the both failed on the water proof side.  The second day was a pure monsoon but neither boot was immersed in water and just subjected to wet undergrowth and the rain.  By the time we reached the trail head both of our feet were soaked.  As I am an official tester for Magnum they will be getting a critique on these shortly.  The good news is neither on of us had foot problems with blisters.  She has some callous problems not related to the boots and I got one warm spot on my pinkie toe. 

All in all a good base of gear and everything for the most part worked as advertised.

Sunday, April 22, 2012

Tactical Toes or Zombie Fleeing shoes

In case you need to flee in a hurry and the weather is nice I found a pair of shoes that weigh a matter of ounces.  The FILA skele toes.  They meet all the criteria for tactical coolness they are black and gray, weigh next to nothing and protect your feet, toes.  These shoes are advertised for use on the street, dirt, water, and mountains.  That covers everything.  I did two miles in them this morning over a mixed track of pavement and dirt road and held up fine.  So if you need to flee in a hurry grab these and save the Magnums or Danner for the bad weather.

Saturday, April 21, 2012

Gunsmith Work

I was trusted this week to work a customer's family heirloom.  It is a Remington Model 1100 made in September of 1973 and bought by his great grandfather.  Very cool anyway the shotgun came to me in
"shot the crap out of it and put in closet when I bought a new gun."  It was replaced by a Benelli with a 3 or 3.5" chamber because the 2 3/4 just would not due anymore.  He wanted a thorough cleaning and to touch up the bluing.  What I found when I got it was much more.  First the barrel and receiver had to be soaked in WD40 before I could get them apart.  Then when I pulled out the trigger group the shell stop fell out NOT good.  So I had to go to my handy AGI 1100 video and find out what the heck was going on.  As I did not take many before pictures  you will have to believe me when I say it was nasty. So I re staked that and went about bluing good thing is I did not have to charge any extra shop time as I could do this and let the bluing take.  Anyway here are a couple of before pics that I did snap.


I took care of the bluing on this and some minor stuff on the receiver.  I have to say that overall the weapon was in good shape.

Here are the after pictures when I had it cleaned up and looking good.
Can you tell I did some bluing touch up here ah no you cannot. 

The bolt came to me completely covered with gunk

Notice the bluing issue on the side that is now gone.
Anyway was nice to work on such a nice piece.  I am beginning to really like the Rem 1100 as I have worked on several.  Too bad Remington got it so wrong with the 742 rifles as they are not so swift. 


Friday, April 13, 2012

I will soon be offering two Rifles

These are basic rifles with a couple extras that I find handy when I am shooting. There will be a 20" and 16" rifle Magpul hand guards, AR front sight. two rails added, a Magpul rear BUIS, plus a P Mag.  These are entry level rifles with enough rail space to add a vertical grip, light and laser if you so choose.  I am waiting on certain paperwork from the Federal and state government to go through and be accepted then I will be in business.  Sadly to begin with the turn time on these rifles are going to be 6-8 weeks.  Since I am going for affordable there will be a mix of manufactures parts do not fret I only buy from reputable sources and all weapons will be test fired to make sure they work and can put steel on target.

They will be nothing fancy and not have a lot of mall Ninja extras but will be affordable and the buyer can add to his or her hearts content later.

I am looking at a starting price of $815 

If the business grow then I will add accessories so a customer can add to their hearts content.

Thanks,
Jarhead Gunsmith

Wednesday, April 11, 2012

Rifle Build Part 1000

As readers know I have been wanting to upgrade my AR15A2 to an A3 configuration. First, it was a money issue, then we ran into a tool issue. Well today, thanks to Midway USA's fast shipping, I got the appropriate wrench and I am done.  Took me longer than it probably should have, but this was my first barrel swap.  My apologies, I am a horrible picture taker.

First my shop such as it is:
Yes this is a Zombie warning poster my kids got me for Christmas


My hand built work bench, I need a bigger tool box, donations anyone? I plan on putting either a place to do spray finish in the corner or a power tool.

My Oly as it was earlier today

Here it is apart I know, I know basic stuff.  The story behind the front sight tower still being on the rifle and me needing to order a different wrench all has to do with the AWB.  I ruined a brass punch, bent that sucker three ways trying to knock out the front sight pins.  The I hammered on them for over an hour trying to remove them...Come to find out, they are permanent so people could not put a front sight tower with a bayonet lug on it.  That is how old school my rifle is. Now to bring it to the 21st century.  Notice the heavy barrel. This thing will shoot straight when I do my part.

Here it is, with the gas tube finally lined up. It only took me 3-4 tries to get the gas tube lined up. The Barrel Nut Alignment Gauge from Brownells was a life saver.  I actually did not need the snap ring pliers, as I did not need to remove the Delta ring assembly.  I was also able to reuse the gas tube and gas tube roll pin.  Remember always punch out left to right and put back in right to left on all AR pins.

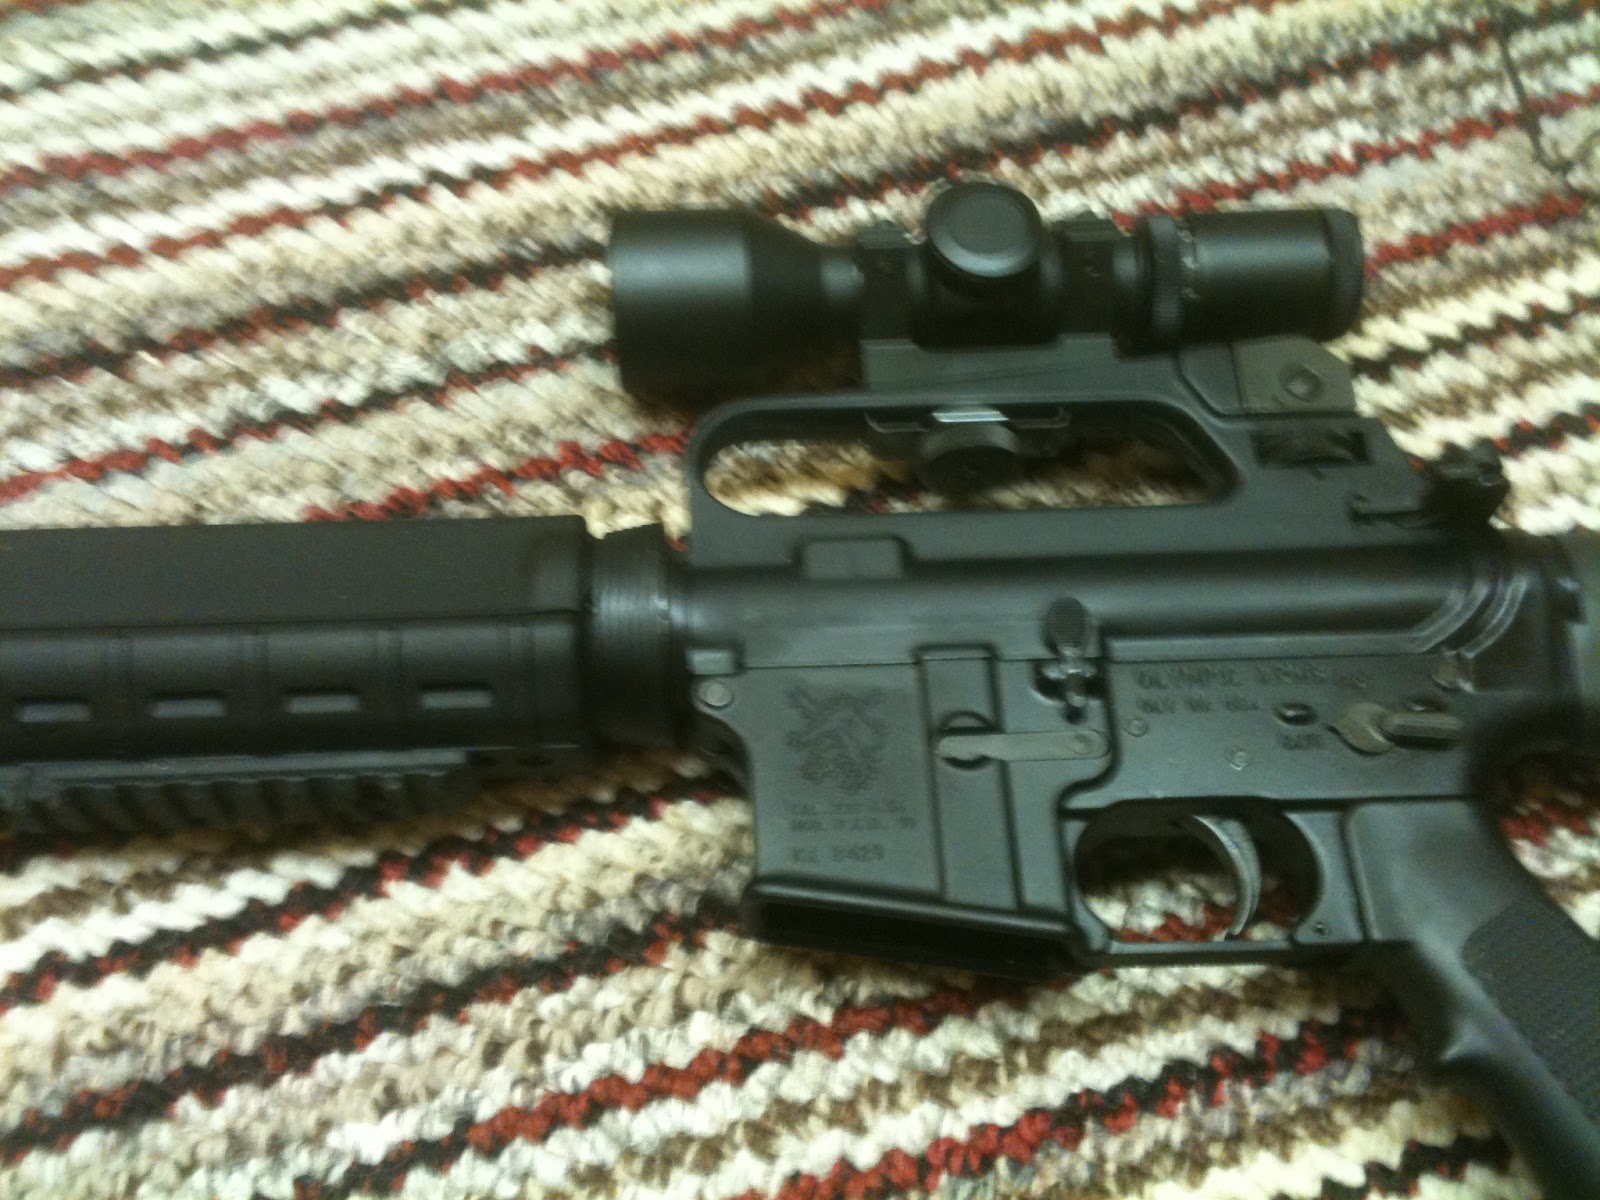
 Here it is in all together
 Yes,that is a Magpul hand guard and rails. Call me a homer, sue me.  I am going to move the light to the vertical grip rail and put the laser with the pressure switch at the 1 o'clock.
 Magpul 1st Gen BUIS,got a good price on it.
 BUIS deployed lined up perfectly.  The good thing about having to leave the front sight tower on is if I got the barrel nut correct it would be lined up as well.
 Right side view
 Here it is, in all its glory, the AR15A3 RK.  There are still some details to work out such as putting a different stock on it and optics.  Any suggestions on optics? Leupold and Trijicon are right out, cannot afford them.

I also staked the carrier key screws today as well.  Sadly, Oly arms did not do this when it made the rifle. Or at least their bolt manufacturer did not. 

Above is the Barrel Nut Alignment gauge from Brownells $6.00

Anti Seize Lubricant (from AutoZone) for the upper receiver barrel nut threads. $4.00

Keep this stuff handy.  I have it in my range bag and ues it almost exclusively on my bench.


Breaker Bar from Autozone $30.00

Combination Wrench Midway $20.00

Master Punch Set Brownells $100, good stuff in this.

Torque Wrench from Amazon $30 including shipping.


A lot of the tools used for this project were from the hardware store.

This is my Rifle there are many like it but this one is mine.